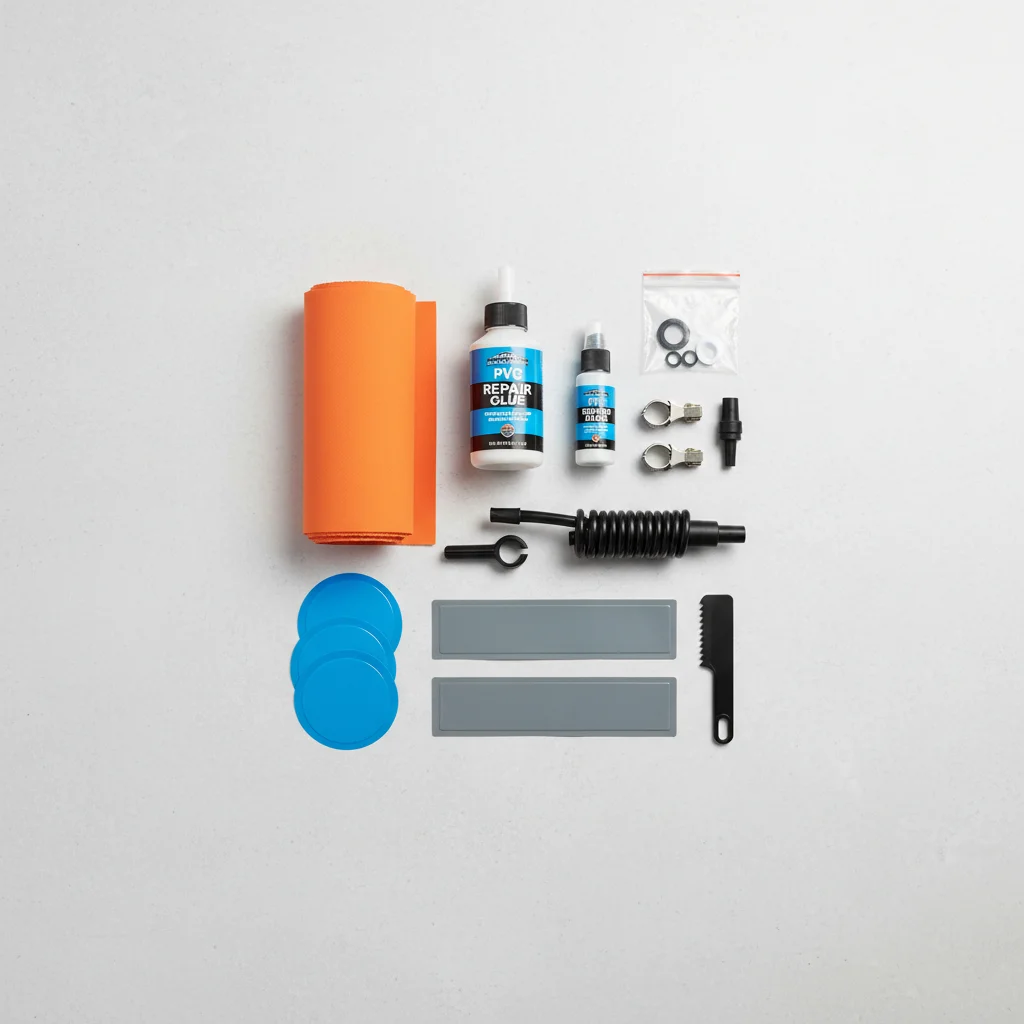
An inflatable paddle board repair kit typically includes PVC patches, specialized adhesive glue, and a valve wrench, which are essential for fixing common issues like small tears, pinholes, and loose valves. These components allow for quick and effective repairs, minimizing downtime and extending the life of your board. Having a kit on hand is crucial for addressing inevitable dings or minor punctures.
Essential Components of a Repair Kit
Every effective inflatable paddle board repair kit should contain several key items. High-quality PVC patches are fundamental, providing the material needed to cover and seal punctures. These patches often come in various sizes and colors; clear or matching PVC is ideal for a seamless repair. The adhesive glue is equally important; it must be specifically formulated for PVC and designed to withstand water exposure and the pressures of an inflated board. A good glue creates a strong, durable bond that prevents further air leakage.
How to Choose the Right Glue for Your Patch
Selecting the correct adhesive is paramount for a lasting repair. For PVC inflatable paddle boards, a two-part PVC adhesive or a specialized urethane-based glue is highly recommended. These glues create a chemical bond with the PVC material, offering superior strength and flexibility compared to general-purpose adhesives. Always check the product description to ensure compatibility with inflatable PVC. Avoid using super glue or rubber cement, as these will not provide a durable, waterproof seal for your paddle board.
Step-by-Step Guide to Patching a Small Hole
Repairing a small hole in your inflatable paddle board is a straightforward process that can be completed in about 30 minutes, plus drying time. First, thoroughly clean and dry the area around the puncture. Lightly sand the area with fine-grit sandpaper to create a better bonding surface. Cut a patch that is at least 1-2 inches larger than the hole on all sides, rounding the corners to prevent peeling. Apply a thin, even layer of glue to both the patch and the board, then firmly press the patch onto the damaged area. Smooth out any air bubbles from the center outwards. Allow the glue to cure for at least 24 hours before reinflating the board.
- Clean the damaged area thoroughly with rubbing alcohol.
- Lightly sand the repair area and the back of the patch.
- Apply a thin, even layer of PVC adhesive to both surfaces.
- Press the patch firmly onto the board, smoothing out air bubbles.
- Allow 24 hours for the glue to fully cure before use.
Addressing Valve Leaks with a Repair Kit
|
Our Picks for the Best Paddle Board in 2026
As an Amazon Associate I earn from qualifying purchases.
|
||
| Num | Product | Action |
|---|---|---|
| 1 | Roc Inflatable Stand Up Paddle Board 10' 6" with Premium SUP Paddle Board Accessories, Wide Stable Design, Non-Slip Comfort Deck for Youth & Adults |

|
| 2 | Roc Inflatable Stand Up Paddle Boards with Premium SUP Paddle Board Accessories, Wide Stable Design, Non-Slip Comfort Deck for Youth & Adults |
|
| 3 | FBSPORT 11' Premium Stand Up Paddle Board, Yoga Board with SUP Accessories & Carry Bag | Wide Stance, Surf Control, Non-Slip Deck, Leash, Paddle and Pump for Youth & Adult |
|
| 4 | Roc Inflatable Stand Up Paddle Board 10' 6" with Premium SUP Paddle Board Accessories, Wide Stable Design, Non-Slip Comfort Deck for Youth & Adults |
|
| 5 | Retrospec June Nano Kids Inflatable Fishing Paddle Board SUP Kayak: 9'6" Hybrid Paddleboard with Rod Holders, Removable Seat - Lightweight Portable Youth Fishing Board |
|
| 6 | FunWater Inflatable Stand Up Paddle Board with Premium SUP Paddleboard Accessories, Anti-Slip EVA Deck, 11'/10'6'' Paddle Boards for Adults & Youth of All Skill Levels |
|
| 7 | FunWater Inflatable Stand Up Paddle Board with Premium SUP Paddleboard Accessories, Anti-Slip EVA Deck, 11'/10'6'' Paddle Boards for Adults & Youth of All Skill Levels |
|
| 8 | Niphean Inflatable Stand Up Paddle Board with SUP Accessories, Anti-Slip EVA Deck, 10’6’’ Inflatable Paddle Boards for Adults & Youth of All Skill Levels |
|
| 9 | Highpi Inflatable Stand Up Paddle Board for Youth and Adults – Wide Sup with Premium Accessories, Blow Up Paddleboard for Surfing, Fishing, Yoga & More |
|
| 10 | Roc Inflatable Stand Up Paddle Board 10' 6" with Premium SUP Paddle Board Accessories, Wide Stable Design, Non-Slip Comfort Deck for Youth & Adults |
|
Sometimes, air leaks aren’t from a puncture but from a loose or faulty valve. Many repair kits include a valve wrench, which is a specialized tool designed to tighten or replace the air valve on your inflatable paddle board. If you notice air escaping from around the valve, gently tighten it with the wrench. Be careful not to overtighten, as this can damage the valve or the board material. If tightening doesn’t resolve the issue, the valve itself might be faulty and require replacement, which can often be done with a new valve and the same wrench.
Having a reliable inflatable paddle board repair kit is an essential part of responsible paddle board ownership. It empowers you to quickly and effectively address minor damage, extending the life of your board and ensuring you’re always ready for your next adventure. Investing in a quality kit and understanding its components will save you time and money in the long run.
Beyond immediate repairs, proper maintenance and storage can significantly reduce the likelihood of needing frequent patches. Always rinse your board with fresh water after use, avoid dragging it over rough surfaces, and store it in a cool, dry place away from direct sunlight. These preventative measures, combined with a well-stocked repair kit, will keep your inflatable paddle board in prime condition for years to come.
Frequently Asked Questions
What are the essential components of an inflatable paddle board repair kit?
An essential inflatable paddle board repair kit typically includes PVC patches, specialized adhesive glue, and a valve wrench. These three items are crucial for addressing common issues like small punctures, tears, and loose air valves.
What type of glue is best for repairing an inflatable PVC paddle board?
For repairing an inflatable PVC paddle board, a two-part PVC adhesive or a specialized urethane-based glue is highly recommended. These glues create a strong chemical bond with the PVC material, offering superior durability and flexibility compared to general-purpose adhesives.
How long does it take to patch a small hole on an inflatable paddle board?
Patching a small hole on an inflatable paddle board typically takes about 30 minutes for the application process. However, the glue requires at least 24 hours to fully cure before the board can be reinflated and used safely on the water.
Can a repair kit fix a leaking valve on an inflatable paddle board?
Yes, many inflatable paddle board repair kits include a valve wrench specifically designed to tighten or replace air valves. If you notice air escaping from around the valve, gently tightening it with the wrench can often resolve the leak.
What should I avoid using when patching my inflatable paddle board?
When patching your inflatable paddle board, avoid using super glue or rubber cement. These adhesives will not provide a durable, waterproof, or flexible seal required for the high-pressure environment of an inflatable paddle board.
Patch a Small Hole on an Inflatable Paddle Board
This guide outlines the steps to effectively repair a small puncture or hole in your inflatable paddle board using a standard repair kit, ensuring a lasting seal.
Thoroughly clean and dry the area around the puncture using rubbing alcohol. Lightly sand the damaged area with fine-grit sandpaper to create a better bonding surface for the patch.
Cut a PVC patch that is at least 1-2 inches larger than the hole on all sides, rounding the corners to prevent peeling. Apply a thin, even layer of specialized PVC adhesive glue to both the patch and the prepared area on the board.
Firmly press the patch onto the damaged area, smoothing out any air bubbles from the center outwards. Ensure there is good contact between the patch and the board for a strong bond.
Allow the glue to cure for at least 24 hours before reinflating the board. This crucial drying time ensures the adhesive forms a strong, durable, and waterproof seal.

I’ve had my iSUP for years and finally needed to patch a small tear. This guide was super helpful in making sure I had all the right stuff. The tip about using clear PVC patches for a seamless repair was a game-changer. My board looks almost new again, and I’m back on the water without any leaks!
The info on specialized adhesive glue was useful, but I wish there were more specific brand recommendations. It’s hard to know which glues are truly formulated for PVC and water exposure without some guidance. Ended up just grabbing what was available, hope it holds up.
Good breakdown of what’s needed. I already had some patches but realized I was missing a proper valve wrench. That’s definitely something you don’t think about until your valve starts acting up. Glad I read this before my next trip, it saved me a lot of hassle.
This was exactly what I needed! I got a small pinhole from a rogue branch and was worried I’d have to buy a whole new board. Knowing that a simple kit with PVC patches and the right glue can fix it is such a relief. It really does extend the life of your board, which is great for the wallet.